Configure SAML 2.0 single sign-on to allow your team to access Zenovay using your organization's identity provider.
Supported Identity Providers
| Provider | Status |
|---|---|
| Okta | Fully Supported |
| Microsoft Entra ID (Azure AD) | Fully Supported |
| OneLogin | Fully Supported |
| Google Workspace | Fully Supported |
| Ping Identity | Fully Supported |
| ADFS | Fully Supported |
| Custom SAML 2.0 | Supported |
Prerequisites
Before starting:
- Scale or Enterprise plan activated
- Admin access to your identity provider
- Owner or Admin access to Zenovay
- Your organization's email domain ready to verify
Zenovay SAML Information
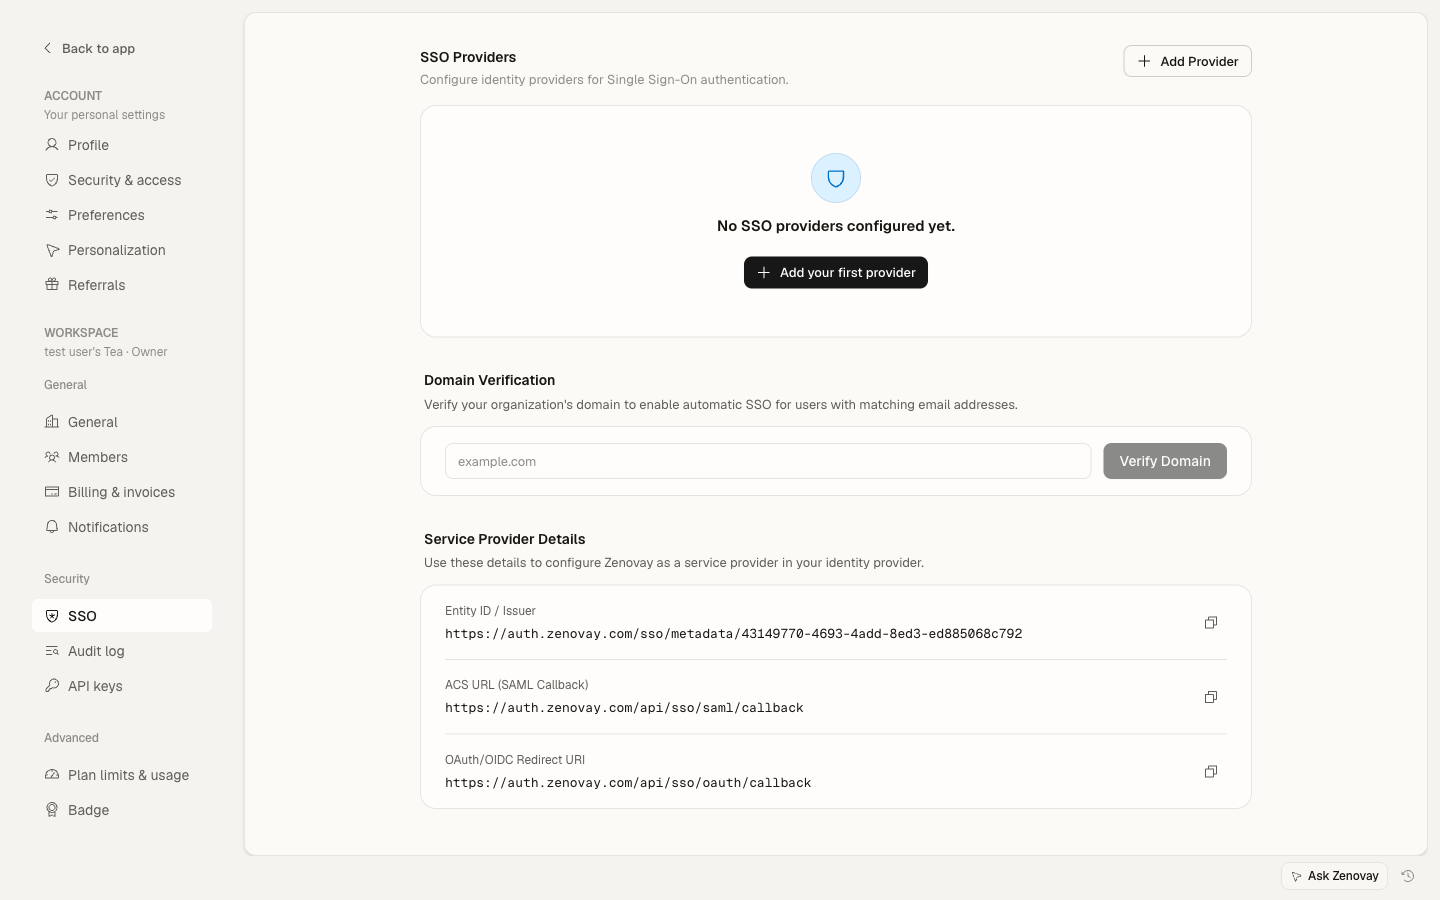
Service Provider Details
You will need these values when configuring the SAML application in your identity provider. Each workspace gets its own Entity ID, so the exact values are shown in Zenovay under Settings → Security → SSO in the Service Provider Details section. The format is:
| Setting | Value |
|---|---|
| SP Entity ID / Audience URI | https://auth.zenovay.com/sso/{teamId} |
| ACS URL (Assertion Consumer Service) | https://auth.zenovay.com/api/sso/saml/callback |
| Metadata URL | https://auth.zenovay.com/api/sso/metadata/{teamId} |
| NameID Format | urn:oasis:names:tc:SAML:1.1:nameid-format:emailAddress |
| Binding | HTTP-POST |
Copy the SP Entity ID and ACS URL directly from the Service Provider Details section in Zenovay rather than typing them by hand. The Entity ID is unique to your workspace (it ends in your team ID), and the ACS URL must include the full path.
Most identity providers can also import the Metadata URL above to fill in the Entity ID and ACS URL automatically.
Getting Your Values
- Go to Settings → Security → SSO
- The Service Provider Details section lists your Entity ID, ACS URL, and OAuth/OIDC redirect URI. Use the copy button next to each value.
- Click Add provider and select SAML to start configuring your IdP.
Okta Configuration
Step 1: Create Okta Application
- Log in to Okta Admin Console
- Go to Applications → Applications
- Click Create App Integration
- Select SAML 2.0
- Click Next
Step 2: Configure SAML Settings
General Settings:
- App name:
Zenovay - App logo: Upload Zenovay logo (optional)
SAML Settings (copy the exact Single sign-on URL and Audience URI from Settings → Security → SSO in Zenovay):
| Okta Field | Value |
|---|---|
| Single sign-on URL | https://auth.zenovay.com/api/sso/saml/callback |
| Audience URI (SP Entity ID) | https://auth.zenovay.com/sso/{teamId} |
| Name ID format | EmailAddress |
| Application username |
Step 3: Attribute Statements
Add these attribute mappings:
| Name | Value |
|---|---|
| user.email | |
| firstName | user.firstName |
| lastName | user.lastName |
Step 4: Get IdP Values
- Go to the Sign On tab
- Click View SAML setup instructions or Identity Provider metadata
- Note the following:
- IdP Entity ID (Issuer)
- IdP SSO URL (Login URL)
- Download the X.509 Certificate
Step 5: Complete in Zenovay
- Go to Settings → Security → SSO
- Click Add provider and select SAML
- Enter:
- Name: e.g., "Okta"
- Entity ID: the IdP Entity ID from Step 4
- SSO URL: the IdP SSO URL from Step 4
- Certificate: paste the full X.509 certificate
- Click Create
- Add and verify your email domain
- Use the provider's Test connection action to confirm it works
Microsoft Entra ID Configuration
Step 1: Create Enterprise Application
- Sign in to the Microsoft Entra admin center
- Go to Identity → Applications → Enterprise applications
- Click New application
- Click Create your own application
- Name:
Zenovay - Select Integrate any other application you don't find in the gallery
Step 2: Set Up Single Sign-On
- Click Single sign-on in the sidebar
- Select SAML
- Edit Basic SAML Configuration (copy the exact values from Settings → Security → SSO in Zenovay):
| Entra ID Field | Value |
|---|---|
| Identifier (Entity ID) | https://auth.zenovay.com/sso/{teamId} |
| Reply URL (ACS URL) | https://auth.zenovay.com/api/sso/saml/callback |
Step 3: Configure Attributes
Edit Attributes & Claims:
| Claim Name | Source Attribute |
|---|---|
| emailaddress | user.mail |
| givenname | user.givenname |
| surname | user.surname |
Ensure the NameID claim format is set to Email address.
Step 4: Download Certificate and Get IdP Values
- Scroll to SAML Signing Certificate and download Certificate (Base64)
- In the Set up Zenovay section, copy:
- Microsoft Entra Identifier — this is your IdP Entity ID
- Login URL — this is your SSO URL
Step 5: Assign Users
- Go to Users and groups
- Add users or groups
- Save assignments
Step 6: Complete in Zenovay
- Go to Settings → Security → SSO
- Click Add provider and select SAML
- Enter:
- Name: e.g., "Microsoft Entra ID"
- Entity ID: the Microsoft Entra Identifier from Step 4
- SSO URL: the Login URL from Step 4
- Certificate: paste the contents of the downloaded Base64 certificate
- Click Create
- Add and verify your email domain
- Use the provider's Test connection action to confirm it works
Google Workspace Configuration
Step 1: Add Custom SAML App
- Go to Google Admin Console
- Go to Apps → Web and mobile apps
- Click Add App → Add custom SAML app
Step 2: Enter Details
App details:
- App name:
Zenovay - Description: Analytics platform
- App icon: Upload (optional)
Step 3: Download IdP Metadata
- Copy or download the SSO URL and Entity ID
- Download the Certificate
- Click Continue
Step 4: Service Provider Details
Copy the exact ACS URL and Entity ID from Settings → Security → SSO in Zenovay:
| Google Admin Field | Value |
|---|---|
| ACS URL | https://auth.zenovay.com/api/sso/saml/callback |
| Entity ID | https://auth.zenovay.com/sso/{teamId} |
| Name ID format | |
| Name ID | Basic Information > Primary email |
Step 5: Attribute Mapping
| Google Directory | App Attribute |
|---|---|
| Primary email | |
| First name | firstName |
| Last name | lastName |
Step 6: Enable for Users
- Click on the app
- Go to User access section
- Turn ON for your organization or specific organizational units
Changes may take up to 24 hours to propagate in Google Workspace.
Step 7: Complete in Zenovay
- Go to Settings → Security → SSO
- Click Add provider and select SAML
- Enter the IdP Entity ID, SSO URL, and Certificate from Step 3
- Click Create
- Add and verify your email domain
- Use the provider's Test connection action to confirm it works
OneLogin Configuration
Step 1: Add Application
- Go to OneLogin Admin
- Go to Applications → Add App
- Search SAML Custom Connector (Advanced)
- Add
Step 2: Configuration Tab
Copy the exact Audience and Recipient/ACS values from Settings → Security → SSO in Zenovay:
| OneLogin Field | Value |
|---|---|
| Audience (EntityID) | https://auth.zenovay.com/sso/{teamId} |
| Recipient | https://auth.zenovay.com/api/sso/saml/callback |
| ACS (Consumer) URL | https://auth.zenovay.com/api/sso/saml/callback |
Step 3: Parameters
Add parameters:
| Field | Value |
|---|---|
| firstName | First Name |
| lastName | Last Name |
Step 4: SSO Tab
Note the following values:
- SAML 2.0 Endpoint (HTTP)
- Issuer URL
- Download the X.509 Certificate
Step 5: Complete in Zenovay
- Go to Settings → Security → SSO
- Click Add provider and select SAML
- Enter the IdP values from Step 4
- Click Create
- Add and verify your email domain
Completing Setup in Zenovay
Add SSO Provider
- Go to Settings → Security → SSO
- Click Add provider
- Select SAML
- Enter the following values from your identity provider:
| Field | Description |
|---|---|
| Name | A friendly name for this provider (e.g., "Corporate Okta") |
| Entity ID | The IdP Entity ID / Issuer from your identity provider |
| SSO URL | The IdP Login URL / SSO Endpoint |
| SLO URL | The IdP Single Logout URL (optional) |
| Certificate | The X.509 signing certificate (paste full PEM including BEGIN/END lines) |
- Click Create
Verify Domain
After saving, add and verify your email domain:
- Enter your email domain (e.g.,
company.com) in the Domain Verification section - Click Verify domain
- Add the TXT record shown to your domain's DNS, then click Check DNS
- Once verified, users with that domain are directed to SSO at sign-in
Test Connection
- Open the provider's More menu and choose Test connection, or test the login flow directly:
- Open an incognito/private browser window
- Go to auth.zenovay.com
- Enter an email from your verified domain
- Authenticate with your IdP
- Verify successful return to the Zenovay dashboard
Enforce SSO
After a successful test, you can require SSO so users can no longer sign in with a password:
- Make sure the provider is enabled (the toggle next to it)
- Open the provider's More menu and select Enforce SSO
- Confirm in the dialog
Before enforcing SSO, ensure at least one Owner account can still sign in via email/password as a backup in case of an IdP outage.
User Provisioning
Just-In-Time (JIT) Provisioning
New users are created automatically on their first successful SSO login:
- The account is created from the email and name in the SAML assertion
- No invitation email is required
JIT-provisioned users are not automatically added to your workspace with a specific role. After their first sign-in, an Owner or Admin may still need to add them to the team and assign a role from Settings → Workspace → Members.
Troubleshooting
Common Issues
| Issue | Solution |
|---|---|
| "Signature verification failed" | Re-download the IdP certificate and update it in Zenovay |
| "Digest mismatch" | Ensure the correct signing certificate is configured |
| "SSO is not configured for your domain" | Add and verify the user's email domain in the SSO settings |
| "ACS URL mismatch" | Ensure the ACS URL is exactly https://auth.zenovay.com/api/sso/saml/callback |
| "Entity ID mismatch" | Ensure the Audience/Entity ID matches the value shown in Settings → Security → SSO (it ends in your team ID) |
| "NameID not found" | Set NameID format to EmailAddress in your IdP |
Certificate Expiration
IdP certificates expire — plan ahead:
- Monitor expiration dates in your IdP
- Download the new certificate before expiration
- Edit the SSO provider in Zenovay and replace the certificate
- Test the connection with the new certificate
Security Best Practices
Certificate Management
- Monitor expiration dates
- Use SHA-256 signing
- Update certificates before they expire
Attribute Security
- Only request needed attributes
- Verify attribute mappings
- Monitor for changes
Access Control
- Assign specific users/groups in your IdP
- Review access regularly
- Use conditional access policies