Configure OAuth 2.0 or OpenID Connect (OIDC) for single sign-on. A modern alternative to SAML for cloud-native identity providers.
SAML vs OAuth/OIDC
| Feature | SAML | OAuth/OIDC |
|---|---|---|
| Protocol | XML-based | JSON/REST |
| Token Format | XML assertion | JWT |
| Best For | Enterprise IdPs | Cloud apps |
| Setup Complexity | Higher | Lower |
If your identity provider supports OpenID Connect, choose OIDC over plain OAuth 2.0 — Zenovay verifies the ID token against your IdP's JWKS endpoint and you supply a single discovery (metadata) URL instead of listing each endpoint by hand.
Supported Providers
| Provider | Protocol |
|---|---|
| Microsoft Entra ID (Azure AD) | OIDC |
| Okta | OIDC |
| Auth0 | OIDC |
| Keycloak | OIDC |
| Custom | OAuth 2.0 / OIDC |
Zenovay OAuth/OIDC Configuration
Redirect URI
Your identity provider will need this redirect URI:
| Setting | Value |
|---|---|
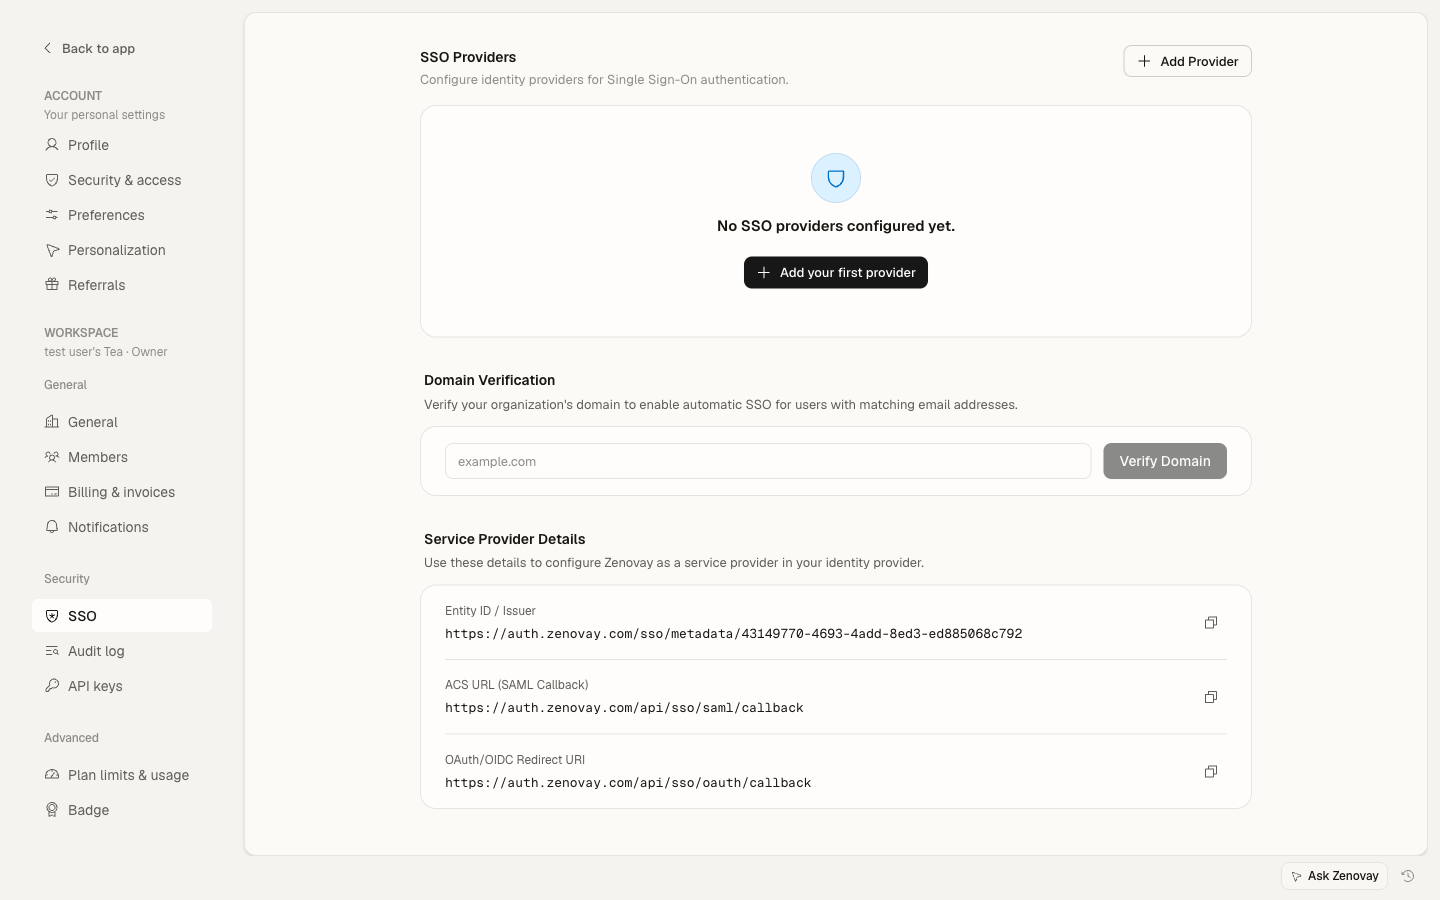
| Redirect URI / Callback URL | https://auth.zenovay.com/api/sso/oauth/callback |
You can copy this value (and the SAML equivalents) directly from Settings → Security → SSO, under Service Provider Details.
Required Scopes
Zenovay requires these scopes:
openid
email
profile
Choosing Between OAuth 2.0 and OpenID Connect
| Feature | OAuth 2.0 | OpenID Connect |
|---|---|---|
| ID Token verification | Not applicable | Automatic via JWKS |
| Fields needed | Client ID, Client Secret, Issuer, Authorization URL, Token URL, Userinfo URL | Client ID, Client Secret, Issuer, Metadata URL |
| Best for | IdPs without OIDC support | Modern IdPs (Okta, Entra ID, Auth0, Keycloak) |
With OIDC you provide the Metadata URL (your IdP's .well-known/openid-configuration document) and Zenovay reads the authorization, token, userinfo, and JWKS endpoints from it. With plain OAuth 2.0 you enter each endpoint URL yourself.
Microsoft Entra ID OIDC Setup
Step 1: Register Application
- Sign in to the Microsoft Entra admin center
- Go to Identity → Applications → App registrations
- Click New registration
- Configure:
| Entra ID Field | Value |
|---|---|
| Name | Zenovay |
| Supported account types | Accounts in this organizational directory only |
| Redirect URI | Web — https://auth.zenovay.com/api/sso/oauth/callback |
- Click Register
Step 2: Create Client Secret
- Go to Certificates & secrets
- Click New client secret
- Set description and expiration
- Copy the secret value immediately (it will not be shown again)
Step 3: Note Application Details
Record these values:
- Application (client) ID — from the Overview page
- Client Secret — from Step 2
- Tenant ID — from the Overview page
Step 4: API Permissions
- Go to API permissions
- Verify Microsoft Graph → User.Read (delegated) is listed
- If not, click Add a permission → Microsoft Graph → Delegated permissions → User.Read
Step 5: Configure in Zenovay
- In Zenovay, go to Settings → Security → SSO
- Click Add provider and choose OpenID Connect
- Enter:
- Provider name: e.g., "Microsoft Entra ID"
- Client ID: the Application (client) ID from Step 3
- Client Secret: the secret value from Step 2
- Issuer:
https://login.microsoftonline.com/{your-tenant-id}/v2.0 - Metadata URL:
https://login.microsoftonline.com/{your-tenant-id}/v2.0/.well-known/openid-configuration
- Click Create
- Add and verify your email domain
- Test the connection
Okta OIDC Setup
Step 1: Create Application
- Go to Okta Admin Console → Applications
- Click Create App Integration
- Select OIDC - OpenID Connect
- Select Web Application
- Click Next
Step 2: Configure Application
| Okta Field | Value |
|---|---|
| App integration name | Zenovay |
| Grant type | Authorization Code |
| Sign-in redirect URIs | https://auth.zenovay.com/api/sso/oauth/callback |
Step 3: Assign Users
- Go to the Assignments tab
- Assign users or groups
- Save
Step 4: Get Credentials
From the General tab, note:
- Client ID
- Client Secret
Step 5: Get Issuer and Metadata URLs
- Go to Security → API in the Okta Admin Console
- Find your authorization server (usually "default")
- The Issuer URI will look like:
https://your-org.okta.com/oauth2/default - The matching Metadata URL is the Issuer URI plus
/.well-known/openid-configuration, for example:https://your-org.okta.com/oauth2/default/.well-known/openid-configuration
Step 6: Configure in Zenovay
- Go to Settings → Security → SSO
- Click Add provider and choose OpenID Connect
- Enter:
- Provider name: e.g., "Okta"
- Client ID: from Step 4
- Client Secret: from Step 4
- Issuer: the Issuer URI from Step 5
- Metadata URL: the discovery URL from Step 5
- Click Create
- Add and verify your email domain
- Test the connection
Auth0 Setup
Step 1: Create Application
- Go to Auth0 Dashboard
- Go to Applications → Create Application
- Choose Regular Web Applications
- Click Create
Step 2: Configure Settings
In the Settings tab:
| Auth0 Field | Value |
|---|---|
| Allowed Callback URLs | https://auth.zenovay.com/api/sso/oauth/callback |
Click Save Changes.
Step 3: Get Credentials
From the Settings tab, note:
- Domain (e.g.,
your-tenant.us.auth0.com) - Client ID
- Client Secret
Step 4: Configure in Zenovay
- Go to Settings → Security → SSO
- Click Add provider and choose OpenID Connect
- Enter:
- Provider name: e.g., "Auth0"
- Client ID: from Step 3
- Client Secret: from Step 3
- Issuer:
https://your-tenant.us.auth0.com/(include trailing slash) - Metadata URL:
https://your-tenant.us.auth0.com/.well-known/openid-configuration
- Click Create
- Add and verify your email domain
- Test the connection
The Auth0 Issuer URL must include the trailing slash. For example: https://dev-xxxxx.us.auth0.com/
Google Workspace
Google Workspace primarily supports SAML 2.0 for custom application integration. For Google Workspace SSO, we recommend using the SAML 2.0 setup guide instead.
If you specifically need OIDC with Google, you can create OAuth credentials in the Google Cloud Console:
- Go to Google Cloud Console → APIs & Services → Credentials
- Click Create Credentials → OAuth client ID
- Select Web application and enter
https://auth.zenovay.com/api/sso/oauth/callbackas the redirect URI - Note the Client ID and Client Secret
- In Zenovay, add an OpenID Connect provider with Issuer
https://accounts.google.comand Metadata URLhttps://accounts.google.com/.well-known/openid-configuration
Custom OIDC Provider
If your identity provider supports OpenID Connect Discovery:
- Go to Settings → Security → SSO
- Click Add provider and choose OpenID Connect
- Enter:
- Provider name: your provider name
- Client ID: from your IdP
- Client Secret: from your IdP
- Issuer: your IdP's issuer URL (e.g.,
https://your-idp.com) - Metadata URL: your IdP's discovery document, usually the issuer URL plus
/.well-known/openid-configuration
- Click Create
Zenovay reads your IdP's authorization, token, userinfo, and JWKS endpoints from the metadata document, so you don't have to enter them individually.
Custom OAuth 2.0 Provider
If your identity provider does not support OIDC discovery, use OAuth 2.0 with manual endpoint configuration:
- Go to Settings → Security → SSO
- Click Add provider and choose OAuth 2.0
- Enter:
- Provider name: your provider name
- Client ID: from your IdP
- Client Secret: from your IdP
- Issuer: your IdP's issuer URL
- Authorization URL: your IdP's authorization endpoint
- Token URL: your IdP's token endpoint
- Userinfo URL: your IdP's user info endpoint
- Click Create
Completing Setup
Verify Domain
After saving your SSO provider, link the email domains your team signs in with so Zenovay knows to route them through SSO:
- In the Domain verification section, enter your email domain (e.g.,
company.com) and click Verify domain - Zenovay returns a DNS TXT record (host and value) — add it at your DNS provider
- Click Check DNS once the record has propagated
- Once verified, users with that email domain are directed to SSO when they sign in
Test Connection
You can run a quick check before enabling the provider:
- Open the provider's actions menu (the ⋯ button on the provider row)
- Click Test connection
- A success toast confirms Zenovay can reach your IdP with the configured credentials
You can also confirm the end-to-end flow manually:
- Open an incognito/private browser window
- Go to auth.zenovay.com
- Choose Sign in with SSO and enter an email from your verified domain
- Authenticate with your IdP
- Verify you return to the Zenovay dashboard
Enable and Enforce SSO
- On the provider row, switch the toggle on to enable the provider
- To require SSO for everyone in the workspace, open the provider's actions menu (⋯) and choose Enforce SSO, then confirm
Before enforcing SSO, make sure at least one Owner account can still sign in via email/password as a backup in case of an IdP outage. Zenovay shows a confirmation warning before enforcement is turned on.
User Attribute Mapping
Standard Claims
| OIDC Claim | Zenovay Field |
|---|---|
| Email address | |
| given_name | First name |
| family_name | Last name |
| sub | Unique identifier |
Just-In-Time Provisioning
New users are created automatically on their first successful SSO login:
- Automatic account creation from the verified email domain
- No invitation needed
Security Features
Zenovay automatically applies these security measures for OAuth/OIDC:
- PKCE (Proof Key for Code Exchange) — protects the authorization code exchange
- State parameter — prevents CSRF attacks
- Nonce validation (OIDC) — prevents token replay attacks
- ID token verification (OIDC) — validates tokens using the IdP's JWKS endpoint
Troubleshooting
Common Errors
| Error | Cause | Solution |
|---|---|---|
| Invalid redirect_uri | URL mismatch | Ensure redirect URI is exactly https://auth.zenovay.com/api/sso/oauth/callback |
| Invalid client_id | Wrong credential | Verify client ID in your IdP dashboard |
| Invalid grant | Code expired | Try again — authorization codes are short-lived |
| Token verification failed | Signature failure | Verify the JWKS endpoint is accessible |
| State parameter mismatch | Session issue | Clear cookies and try in an incognito window |
| OIDC discovery failed | Metadata URL issue | Open {metadata-url} in your browser and confirm it returns the .well-known/openid-configuration document |
Certificate Issues
If JWKS fails:
- Check the JWKS URL is accessible
- Verify the SSL certificate is valid
- Check for firewall blocks
Security Considerations
Secret Management
- Store the client secret securely
- Rotate secrets before they expire
- Never expose secrets in client-side code
Scope Limitations
Request minimal scopes:
- Only
openid,email,profile - Don't request unnecessary access
Redirect URI Validation
- Use exact match validation in your IdP
- Don't use wildcards
- HTTPS required